Thursday, 13 December 2012

The New Trimmer is here!!!!

Well, it's been available for a while, but I didn't want to post about it until I had received mine, and tried it. It's official, I LOVE it. The UK version also has measurements in cms and inches. So here's the official video and info. If you fancy one for yourself, then you can place your order through me.


  • An extra-wide 15.9 cm cutting base and an extended 39 cm ruler
    • The extra-wide cutting base provides a large work area and is marked in 4 mm increments, allowing for small measurements.
    • The right-side grid helps you measure and cut very thin strips.
    • The extended cutting arm has a stabilizing leg to provide a sturdy and steady cutting surface for longer cuts.
    • When fully extended, the extended cutting arm sits flush with the trimmer base, providing more accurate and consistent measurements across the entire surface.
    • All rulers and measurements on the base are printed under a plastic cover so your measurements won’t wear off.
    • The base has nonskid feet, which keeps the Stampin’ Trimmer securely in place on your work area.
  • A full 30.5 cm cutting and scoring track
    • The extra-long cutting track has space at the top and bottom so you don’t have to take the cutting and scoring blades out when you’re not using them.
    • The track gives you enough space to cut or score a full 30.5 cm without having to remove or switch out handles.
    • The cutting track locks in place for secure storage or transport.
    • The track includes an insertion point for cutting and scoring blade handles so you can easily insert handles into the cutting track.
  • Specially designed handles and cutting track to ensure straight cuts
    • The hook on the scoring and cutting blade handles keeps the handles stable so the cuts are as straight as possible.
    • Handles come in two colors: dark for cutting, light for scoring.
    • The precision tip on the cutting blade allows you to pinpoint precisely where you’re cutting.
    • The point on the side of each handle shows you where the blade will cut, making it easy to see exactly where your cuts and scores will begin.
  • Storage compartment under base
    • The storage compartment holds scoring and cutting tools such as a Bone Folder, Simply Scored Stylus, extra scoring and cutting blades and even business cards.
    • Separate compartments within the storage compartment keep your tools organized, and the clear cover makes it easy to see what you’ve stored.

Friday, 9 November 2012

46 Days to Go

Ok, so even I'm getting bored of the titles already, but I'm not getting bored of all the Christmas crafting! I've been busy preparing class packs for a workshop I'm holding on 21st November in Manchester.

I have had time t finish another quick project for you using Novembers amazing Cocktail of Card kit, which includes the stampin' Up! Candlelight Christmas papers.

This time it's a mini book.

It's still waiting for some Christmas photos though.


In addition to what's in the kit, I've also used the following Stampin' Up! Products.

114320 - On Board Sheets (chipboard)

117335 - Perfect Polka Dots Embossing Folder

113463 - Top Note Bigz die

119847 - Ornament Punch

119855 - Large Oval Punch

120907 - Decorative Label Punch

124005 - Glimmer Paper

119856 - Scallop Oval Punch

Please contact me if you want any further details of this, or woukd like to book on a class to make this.


Wednesday, 7 November 2012

48 Days to Go!

Loving the fact that titles are soo easy to think of at this time of year (if a little boring and predictable)!

Here is another Stampin' Up! Christmas project. This time a scrapbook page just waiting for the right photo from our Christmas celebrations to complete it.


I have used papers from the Stampin' Up! Candlelight Christmas paper pack.


That's not all. All the papers, card and ribbons used are available in a scrapbook layout kit I have put together. The kit includes 1 of each of the fabulous papers from the Candlelight Christmas set, and 1 sheet of flocked acetate from the same set. Also in the kit 3 sheets of 12 x 12 card stock in coordinating colours and some coordinating ribbons, and some themed die cuts.

This fantastic kit is only £10 + £2.50 postage. Only available for the rest of November from Cocktail of Card, so contact me soon if you want one of these kits full of Stampin' Up! Product.

Emma


Monday, 5 November 2012

50 Days Until........

CHRISTMAS!!! yeah!

I've even got the sign to prove it!! ( although I'm late posting so it's almost 49!)


And I think that should mean the start of some Christmas themed projects!!!!

Here is what ive been playing with today.


A cute little 3d Christmas ornament using the stampin' Up! Scentsational Season stamp set and dies. Contact me for details of any products you see on this blog.

Emma


So Many Fantastic Offers.

Stampin' Up! Have so many fabulous offers on at the moment.

1) Anybody who joins my Stampin' Up! Team during November, will not only be starting a fabulous new venture for just £99, but will also be entitled to a free paper pack every month for the first 6 months. Click the image below for full details.

2) If you host a party with sales totalling at least £325, not only will you get at least £50 of free Stampin' Up goodies, you will also qualify for a set of 10 full size ink pads. For full details click the image below, and contact me if you want to book a Stampin' Up! Party.

And as if that wasn't enough.......

3) If you order the Candlelight Christmas papers and the Ornament Keepsakes stamp set or Ornament Keepsakes bundle, then you will get a free paper piercing kit free. Click below for full details.

Contact me for further details on any of the above.


Friday, 2 November 2012

Winner!!!!!

The draw for the treasure hunt was held earlier this week, and unfortunately, none of the entries via my blog won, but I promised to do a draw of all followers of my blog. I listed all the followers and then used randomnumber.org to select a winner. And the winner is.............

ROZ POWELL

Well done. You have won a Stampin' Up! Reason to Smile stamp set. I will contact you to arrange posting it out.

Watch this space for another fab Stampin' Up! Giveaway soon.

Sunday, 28 October 2012

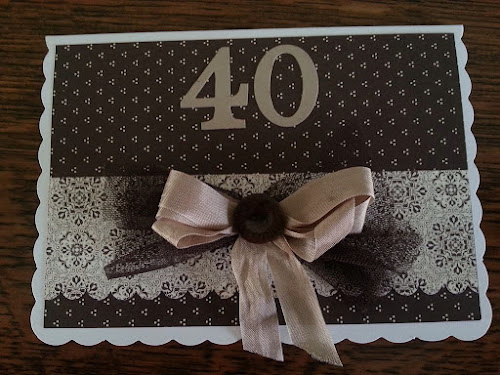
40th Birthday Card

For somebody who loves paper crafts and cardmaking, I seem to always forget to make birthday cards. Thankfully, Stampin' Up! makes it easy to make a quick, but beautifully co-ordinated card.


This one uses the beautiful candlelight Christmas papers, which are definitely not just for Christmas, and some of the lovely scalloped tulle. The Stampin' Up! Colour families which co-ordinate with all the designer papers are soo easy to use.

If you want to find out more about the Stampin' Up! Colours and co-ordinating papers, why not host your own Stampin' Up! Party in your own home. Contact me for more details.

Emma


Wednesday, 24 October 2012

Gingerbread stamping fun!!

The holiday collection Stampin' Up! Framelit dies

Stampin' Up! Framelits
Scentsational Season Stampin' Up! Stamps

Stampin' Up! Stamps
And an Ikea gingerbread recipe

To the kitchen, then the craft room I think. Watch this space!!!!


Thursday, 4 October 2012

Serene Snowflakes Class

Just a few quick photos from a class I did on Monday using Serene Snowflakes (now retired).  It was a lot of fun, as I had a fantastic group of ladies doing the class.


I've also received a big box of goodies from the two current catalogues so watch this space for some new projects with some fab new products over the next few weeks.
 
Emma

Wednesday, 3 October 2012

Hostess Club starting in November


Do you love the Stampin’ Up products but don’t want to host a Stampin’ Up workshop at your home?  You may not have many crafting friends or have the space to host a workshop. If you join the hostess club you can earn all the benefits associated with being a hostess without ever having to host a work-shop at your home.

I have places left to join the next stampers club which lasts for 6 months, starting November 2012.  Each month I will contact you to ask what you would like to order for a minimum of £25. The 6 members take it in turns to be the virtual hostess and when it’s your turn you will receive at least £25 hostess pounds to spend on any goods of your choice from the catalogue as well as the goods you have ordered.

For joining, you will also receive a FREE copy of The Idea Book & Catalogue (rrp £5.00). You can of course order more than the minimum amount and have the possibility of increasing the hostess benefits.

For anyone not living local to me and unable to collect their orders, I ask for an extra £2.50 each month to help contribute towards to cost of posting your items via Royal Mail, I am happy to pay any extra postage charges if your parcel is more expensive to post.

Please register your interest, there are only 4 places remaining.
Contact emmaelee@btinternet.com. Or 07958222317

Monday, 1 October 2012

In Love With Stamping Blog Hop & New Catalogue

The final catalogue is here, it is amazing, please take time to have a browse through it by clicking here.

I am also taking part in the In Love with Stamping blog hop, so it you have arrived here from Tara's lovely blog then welcome.

Here is my project using the Snow Flurry Bigz die, the stunning Candlelight Christmas Designer Papers and the champagne glimmer paper, all from the new Autumn Winter catalogue.  I have also used the Apothecary Accents Framelits and the Curly Cute stampn set from the new catalogue.


There is also a fantastic new offer for anybody who signs up as a Demonstrator during October and November.

Anyway, Emma's blog is the next one on the hop, so I hope you enjoy the rest of the journey.

As always, if you want anymore information on any of the products, want to place and order or host a party, then please contact me.

Emma

Full blog list in case you get stuck.
1 - CreativeIdeas_Laura http://laura-creativeideas.blogspot.com
2 - Margaretk21 - http://makingpapercrafts.blogspot.com
3 - Angela www.sparklycards.blogspot.co.uk
4 - Leanie - www.beautifulimpressions.co.uk
5 - Alison - www.craftingalison.blogspot.com
6 - Beckie - www.bextiesandstickytape.blogspot.com
7 - Gill - http://lilybygilly.wordpress.com
8 - Diane - http://craftwithstyle.blogspot.com
9 - Dawn - www.tartanstamper.blogspot.com
10- Zoë http://www.stampingscene.blogspot.com
11- Fiona W - http://oakfieldcrafts.blogspot.com
12- Elaina - http://moulinrougestamps.blogspot.co.uk
13- Anne-Marie - http://classycrafters.blogspot.co.uk
14- Sarah - http://esellek.blogspot.co.uk
15- Vronnie - http://vronstampin.blogspot.co.uk
16- Christa - http://serendipity-stamping.blogspot.co.uk
17- RuthE - http://pearsonifiedcrafting.blogspot.co.uk
18- CarolynUK - http://stampaholix.blogspot.co.uk/
19- Amanda - http://thecraftspa.blogspot.com
20- Patricia - http://stampinbeckscraft.blogspot.com
21- Tara - http://ihaventgotacleverblogname.blogspot.co.uk
22- Emma (Citaborca) - http://cocktailofcard.blogspot.co.uk/
23- Emma H - http://www.emma-letsstamp.blogspot.co.uk
24- Sarah Scribbles - http://card-delights.blogspot.com
25- Sarnie - http://www.kraftybiker.blogspot.com/
26- Sharon - http://all-inked-up-sharon.blogspot.co.uk
27- Lynn - http://www.heavenlycrafts.com/stampinheaven/
28- Emma - http://www.emma-daye.blogspot.com
29- Erika - http://twintroublescreations.blogspot.co.uk/
30- Elaine - http://thesassystampers.blogspot.co.uk/
31- Nicky - http://nickyjohncock.blogspot.com
32- Jane - http://cheshiredesignhouse.blogspot.com/
33- Kara - http://karascraftycorner.blogspot.com/
34- Ally - http://www.serendipitypapercuts.blogspot.com
35- Clare (Sparkle) - http://www.sparklecrafts.blogspot.com
36- Julie H (craftybug) - http://www.the-crafty-bug.blogspot.com
37- Jane (browniow) - http://www.janeiowcraftycreations.blogspot.com/

Sunday, 23 September 2012

Just a quick post!!

This is only a quick post, as I haven't spent much time in the craft room today, but I just felt the need to do a quick project (not sure I would even call it a project!) that involved getting messy!!  I have lots of projects on the go that require me to concentrate and be precise etc, but wasnt in the mood for any of them.  This is also the first retiring list I have had to deal with as a demonstrator, so decided to use a samp set which is on its way out. 

 
Not the best ever photo, but hopefully you can get an idea.  Thought it was great that the words on the Flight of the Butterfly stamp also talks about change, and it allowed me to get very messy!!
 
And even better, look what I used to do it on........


An old Stampin' Up! catalogue.  Really felt it all tied in with my current jobs of sort out my old SU stamp sets.  I will try and get back to my other projects tomorrow, but may just be having too much fun getting messy!!

Friday, 21 September 2012

Autumn Accents Wreath


 I have to admit, there are soo many exciting new products in my craft room from the new Autumn/Winter catalogue, and some sneaky peek products from the new annual catalogue, that I'm a bit overwhelmed!! I keep walking round opening packets, and stroking things, and "ohing and ahing" at the new catalogue, that I'm not actually getting a lot of crafting done. 

Ayway, before I launch too much into Christmas stuff on my blog, I thought I would share this little autumn wreath I made using the Autumn Accents Bigz Die from the Autumn Wintere catalogue.


It was really good fun to make, and also used the stunning new Scalloped Tulle Ribbon.


There is also a stunning set of stamps to go with the die (watch this space for some projects using these soon.)
 
If you would like to order any of the products shown, or order a copy of the Autumn/Winter catalogue, then please contact me.
 
Emma


Wednesday, 12 September 2012

Changes to Stampin' Up! Ink Pads


Wih the introduction of the 2012-2013 annual catalogue, we have made a very big change to our Stampin’ Pads.
Introducing firm foam pads! They change your stamping experience for the better.
We know you’re going to love these new Stampin’ Pads--just look at all the exciting benefits listed below:
  • Provide better ink coverage for your stamps!
  • Light-tap stamping produces flawless images!  
In addition, our new Stampin’ Pads
  • Create wonderfully solid images. The Firm Foam releases more ink onto your rubber stamp than the felt pads. When using the Firm Foam pad, your stamp will get an even, solid covering of ink that you may not have been able to achieve with the felt pads. Please note: if you are using the ink pad frequently you may need to re-ink your Firm Foam pad more often. We recommend that you purchase a refill at the time of your ink pad purchase.
  • Have a crisply printed, glossy label on the top of the pad that is easier to read and that will not fade or chip off!
  • Come with colour name labels in all four languages (English, Spanish, French, and German)—just choose your language, peel it off the back, and add it to the side of the pad for easy identification!
  • Use the same patented flip-top case design that stores the inking surface upside down, so the pad surface stays moist!
  • Are available in all colours, including our exclusive In Colors!
Let your customers know about these exciting changes to our Stampin’ Pads. Be sure to have at least one on hand so your customers can see and experience for themselves the improved quality of our Stampin’ Up! Stampin’ Pads.
Please note: Five ink colours have undergone formula changes to improve functionality and colour stability with the new firm foam pads. These colours are
  • Basic Black
  • Basic Gray
  • Marina Mist
  • Perfect Plum
  • Tempting Turquoise
All five colours of the reformulated inks have been fully tested and approved. While using the new ink formula in the old Stampin’ Pads is fine, we do not recommend using the old ink formula in these five colours in the new firm foam pads.
We do not recommend using the Basic Black Classic Stampin' Pad on Whisper White or Very Vanilla Card Stock. Instead, we recommend you use the StazOn Ink Pad

New Firm Foam Pads FAQs


Q: Why did we switch from felt pads to firm foam pads?
A: We have worked very hard to improve the functionality of our Classic Stampin’ Pads. The firm foam allows for better ink coverage; plus it stays juicer and lasts longer.
Q: Do old Classic Stampin’ Ink Refills work with the new firm foam pads?
A: Yes, with the exception of Basic Black, Basic Gray, Marina Mist, Perfect Plum, and Tempting Turquoise, which have been reformulated to work with the new foam pad material. We do not recommend using old ink refills in these colours with the new firm foam pads.
Q: Before I use my firm foam pad, do I need to tap it and massage the ink around?
A:  No. The firm foam pads are ready for use immediately. The best stamping technique with the firm foam pad is light tapping.
Q: My pad is too wet. What should I do?
A: The closer to the manufacture date, the juicer the pad will be. As the pad ages, this problem will fade. In the meantime, very light tapping will reduce the extra ink on the stamp. You can also use a paper towel to blot the area of the stamp pad that you will be using.
Q: The firm foam on my lighter colour pads looks blotchy. Is this normal?
A: Yes. The blotchiness is caused by the characteristics of the pad material. It does not affect the stamped image.
Q: When I first stamp with certain colours, my images seem a lot darker. Why is this happening?
A: When stamping with your old pads, you had to work hard to get even ink coverage on your stamp. With the new firm foam pad, the stamp gets a lot more ink on it so when you stamp, your image will appear darker.  Once your stamped image dries, the colour will look normal.
Q: When I compare the firm foam pads to my felt pads, some of the colours don’t seem to match. Why is this?
A: The firm foam and felt will not match exactly. Ink reacts differently to different materials. We have quality checked each ink colour to ensure that the stamped ink colour is true.
Q: How long will the pad last before I need to re-ink it?
A: The amount you use it will affect how often you need to re-ink. Please keep in mind that these pads release a lot more ink onto your stamp, resulting in a crisp, solid image. Since the pads release more ink, they will need to be refilled more often.
Q: What is the best way to remove the colour labels from the bottom of the ink pad?
A: Start at the right bottom corner (just above the barcode) and slowly peel the corner up by removing both layers.
Q: Which end of the case do you apply the label to?
A: The label goes on the end where you open the case.
Q: If the ink pad becomes saturated with ink or liquid, will it cause the label to fall off?
A: No, the label should not be affected. However, like most labels, if you pick at it or try and remove it, it may start to peel up.
Q: What are some additional features of the new firm foam pads that I can share with my customers?
A: See additional features below:
  • The firm foam is nice and flat and will not become wavy.
  • The firm foam material does not imprint on the stamp images like the felt pad sometimes did. However, because the firm foam material is a foam base material, the stamp image can momentarily leave an imprint on the pad, which can transfer to a second stamped image. By inking your stamp on different areas of the pad or waiting momentarily for the ink to rise back to the top, you can easily avoid this situation.
  • The firm foam material is soft and has a nice bounce to it. It’s not hard like the felt is.
  • The ink lay-down (how the ink is absorbed into the card stock) is even, not blotchy, and dries quickly. It has an increased opacity and stamps solid images beautifully.
  • Please note: We do not recommend using the Basic Black Classic Stampin' Pad on Whisper White or Very Vanilla Card Stock. Instead, we recommend you use the StazOn Ink Pad.
Q: Will Stampin’ Spots use the new firm foam pad?
A: No. Stampin’ Spots will remain the same.
Q: Can I use the reformulated ink with my Stampin’ Spots?
A: Yes.
Q: Can I use the reformulated ink with my Stampin’ Around Wheels?
A: Yes.
Q: My ink pad needs re-inking during a stamp camp. Why?
A: There are several reasons for this:
  • The ink level in the firm foam pads is less than it was in the felt pads because of the slight difference in material.
  • The firm foam has a variation in thickness and density that requires the manufacturer to adjust the ink level.
  • Heavy stamping techniques will use more ink than light stamping techniques.
  • Larger stamped images will use more ink that smaller stamped images. 
  • Large groups of people using the pad at the same time will result in the ink pads needing to be refilled more often.

No comments:


Tuesday, 11 September 2012

Candlelight Christmas Class

I love this set of speciality papers in the autumn winter catalogue, they are soo versatile, and not just for Christmas. They are also suitable for cards, scrapbooking, and many more projects.

These are the three items we will be making at the class on Monday 8th October.


And here are some pictures of the two boxes open so that you can see what they look like inside.


The cost of the class is £15 and you will get everything you need to complete the projects, including half a packet of the Candlelight Christmas Speciality Paper.


That's one sheet of each fantastic double sided design.  This means that you will have plenty of the paper left over to use on other projects.  What out for some ideas using this paper over the next few weeks.

The class will be held from 7.30pm until 10pm (ish) at my house.  Places are very limited,so places need to be booked and a deposit of £5 paid by Monday 1st October.  Please contact me if you want any more details, or to book a place.

Emma


Saturday, 8 September 2012

Retired List Blog Hop - Serene Snowflakes

One of my favourite stamp christmas stamp sets from the current catalogue is Serene Snowflakes,


and it is on the retired list (Boo!), but it did make it easy to decide what I should post of the retired list blog hop on In Love with Stamping!  You should've arrived here from

http://pearsonifiedcrafting.blogspot.co.uk

Here a couple of cards from a stack of 10 that I have done using the one sheet wonder method.


And here is a 3d tag made with the same set, which can then be used a s tree ornament aferwards.


Your next stop on the hop is

www.craftingalison.blogspot.com

I have also included a full list of blogs just in case there are any technical hitches in the list!
I hope you enjoy the rest of the hop.

Emma

www.craftyalisoninlyon.blogspot.com
http://craftylittlemoos.blogspot.com/
 www.beautifulimpressions.co.uk
 www.jaynescraftycorner.blogspot.com
www.ribbonhoarder.blogspot.com
http://pearsonifiedcrafting.blogspot.co.uk
http://cocktailofcard.blogspot.co.uk
 www.craftingalison.blogspot.com

Thursday, 6 September 2012

We are having a treasure Hunt!

We are having a treasure hunt, and do you want to know what the treasure is???

$150 of Stampin' Up! Goodies of your choice ( yes I did mean dollars as the prize is from America!)

Interested in playing? Here's how:

I have a link of all the blogs in the Late Night Stampers web ring at the bottom of this post.  Visit these blogs, and find 50 treasure hunt clues. ( they aren't on every blog, and the hunt started mid August,mso they shouldn't be any further back than that). The post will have this photo in it, just above the clue.

My clue is STAMP-A-MA-JIG
Email me at emmaelee@btinternet.com listing all 50 clues and where you found them, and I will enter you in te prize draw.
The draw will be led on 31st October and the winner will be notified by email.

Also, follow my blog, and I will randomly select a follower to receive a free stamp set as well.

Good luck.

Late Night Stamper WEB RING